I hope everyone had a good time this past week with the holidays and all. My partner and I spent time with my family, and made plently of new goodies which included simits, a delicious turkish savory delicacy.
 |
| Simit |
In Turkish cuisine, two types of simits are predominant: one savoury, large, and thick simit, and one sweet, small, thin one. This recipe is to make the former, which I prefer! I love having these with breakfast: it goes with any spread, cheese, you name it.
So, I decided that the family would have Simit for breakfast on Good Friday. I'm a lazy man so I decided to do most of the prep the night before, leaving little to do for the next day before breakfast time!
In making any recipe that will stay in the fridge overnight, one must be careful about the yeast content. I am using 1 tsp here. If you are in a hurry and want to do this in one go, add 1/2 tsp extra yeast, and instead of putting them in the fridge, let them grow for 90 minutes, and then continue at the "dipping" stage.
SIMIT RECIPE (Makes 8 Simits)
For the dough
Bread flour - 500 gr
Instant yeast - 1 tsp ((1 1/2 tsp if you are doing this in one go))
Salt - 1 1/4 tsp
Water - 300 gr
For dipping
Molasses 1/2 cup
Water 1/2 cup
For the water - molasses mixture, it's only important that you use the same volume for each ingredient. The amount doesn't really matter as long as you have enough to coat your simits.
Sesame seeds as required
Night before
Step 1) Mix the flour, yeats, and water until combined, cover (with cling film), and let rest for 20-30 minutes (this makes kneading shorter)
Step 2) Sprinkle the salt over the dough and knead for around 8-10 minutes until you have a smooth dough. Turkish cooks will always tell you it should be the consistency of your earlobe
 |
| Earlobe consistency! |
Step 3) Cover and let the dough about 1 1/2 to 2 hours or until doubled in size. If you used the extra yeast, this should be around 1 hour only
Step 4) Place dough onto your work surface. I don't use any flour, but if you do, please use very little. Roll the dough into a log and cut into 8 equal pieces.
Step 5) Line a large baking tray with parchment paper and spray some oil on the surface.
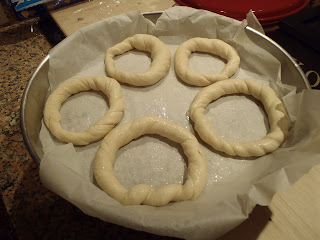
Step 6)Next, take each piece, roll out 10 inch (25cm) long. Make sure it is the same thickness throughout (this is actually not easy, don't worry too much if it's uneven). Then, twist one edge while holding the other. You will feel the dought doesn't want to twist anymore. At this point, bring the two sides together and seal them together by rolling your palm over it. The edges should overlap around 1 1/2 inch (4 cm). Be careful not to flatten it, otherwise your simits may be uneven. Place these on the baking tray. At this point, don't worry if they are too small, you can stretch them out later.
 |
| Shaped simits |
Next morning
Step 1) Rise and shine. Take the simits out of the fridge and let them rest at room temperature. Meanwhile, dissolve the molasses in the water. Pour some sesame seeds in a separate plate.
 |
| Ready to dip! |
Step 3) Let the simits grow again for around 1 hours or more if necessary. Hopefully, the yeast is not dead, and your simits will rise again. If they don't, no worries, you will still have a good tasting simit. It may take some time for the simit to start to rise as it was in the fridge overnight. If by 1 hour you haven't noticed any chance, you can start baking them. To check whether the simit is growing, just poke it gently with your finger. If the hole you made bounces back quickly, then the yeast is most likely active: if it collapses, then there is probably no yeast activity left.
Step 4) Preheat your oven to 260C / 500F (very hot!). Place the tray into the oven and let it bake for 15-20 minutes or until brown. The molasses give the simits a dark colour. I generally flip the simits over for the last 5 minutes of baking (it takes 20 minutes in my oven), to ensure both sides are crispy.
Step 5) You're done! All is left now is to enjoy your work!
Simits are best when still warm. Let them cool for 5 minutes, and then consume with various breakfast or brunch foods. Here's a picture of our table on Good Friday morning!
 |
| Good Friday breakfast |